
Its been about a year since we put a small version of the travel trailer solar system I described in a previous article. Well, I have noticed most people are interested in adding solar capability to their rigs, often with dreams of running nearly everything in their campers (Air conditioning is the big one). If you are an engineer like me or just like to read and research and build projects, then you will have a lot of fun building your solar system for your travel trailer and your particular needs. There are a lot of different aspects to consider though, so I hope this comprehensive guide and update to my own system helps some of you!
Solar Misconceptions when Traveling
Many people, myself included, have big dreams of running climate control like air conditioners and heaters from their solar system and batteries. Climate control requires “A LOT” of power. If you remove the idea of running freezing cold AC 24/7 from your plan you could size the system much smaller. The flip side of this is that most people who calculate the power use of an air conditioner, assume it is running at its maximum at all times. If you set the thermostat modestly you may be able to save some money on batteries.
I’ll go through each part of a complete solar system and comment about the reasons I went with each, where I want to go, and some simple ideas about how to calculate your needs. I’ll include links to items that helped me along the way and of course share my mistakes.
Batteries
There are several choices for battery chemistry but really only one choice that makes sense at this point — Lithium Iron Phosphate (LiFePO4). Most others have major disadvantages (only 50% usable capacity, short lifespan, off-gasing flammable gasses while charging, etc) in exchange for a cheaper price.
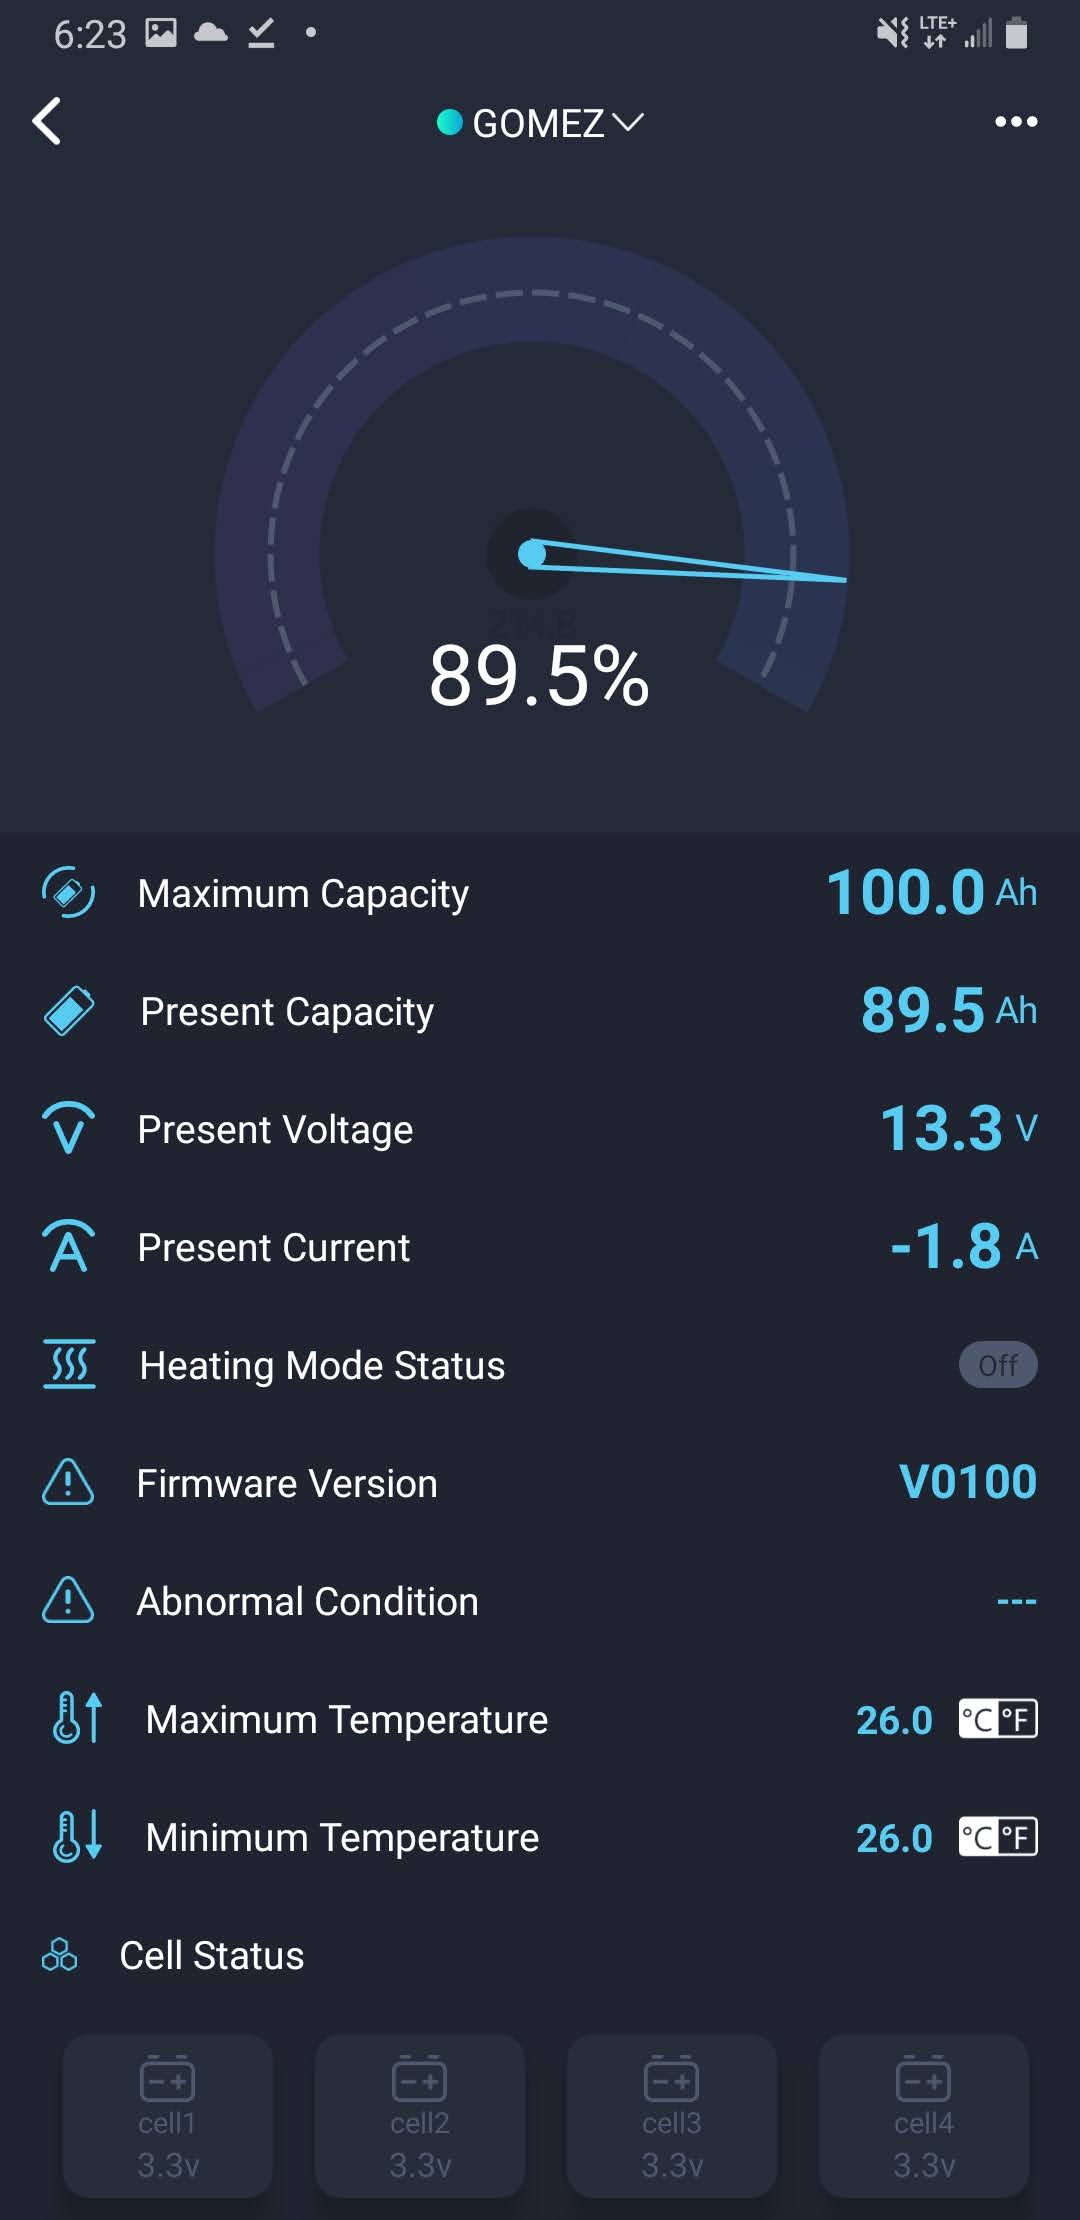
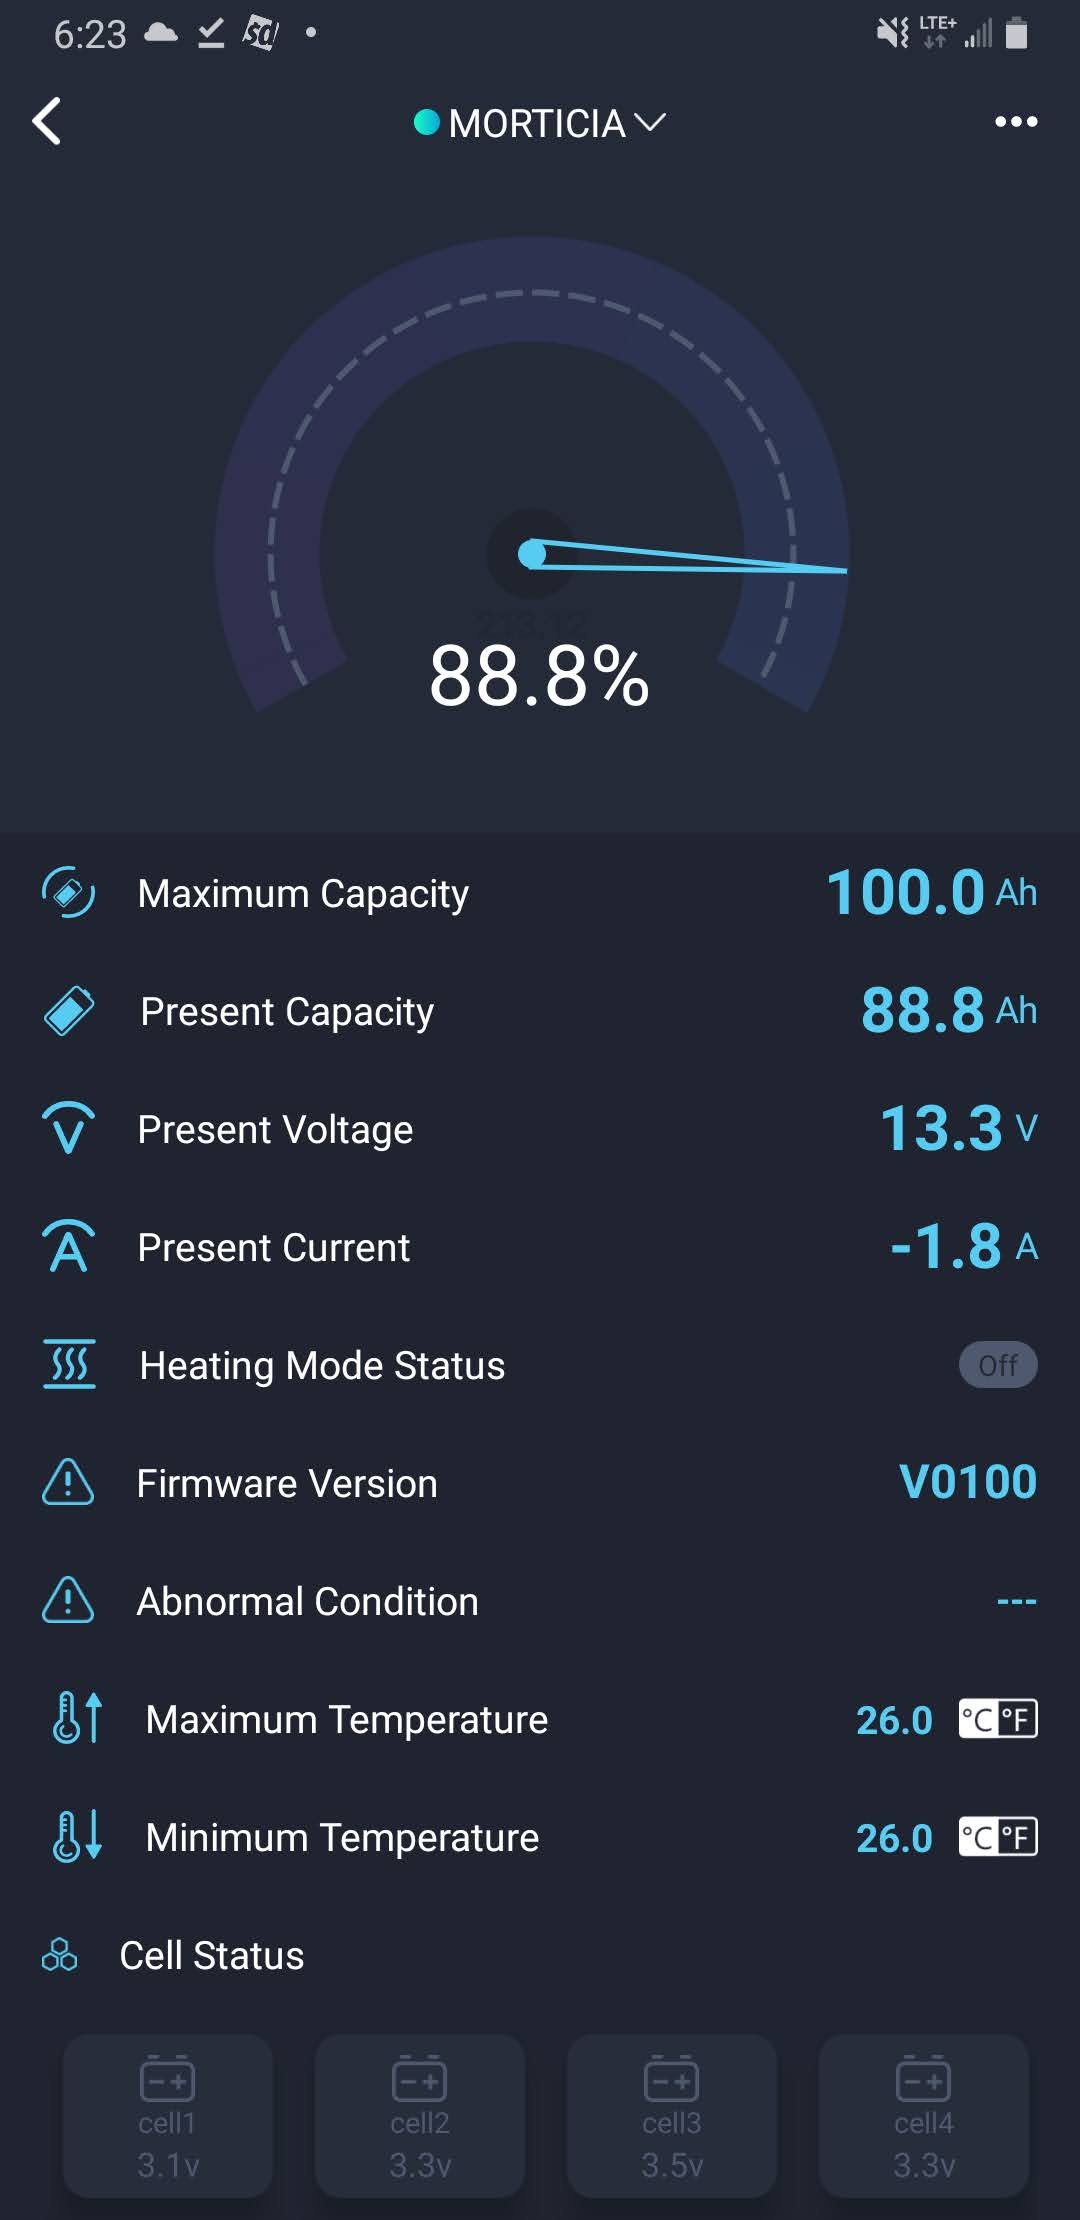
There are also different ways LiFePO4 are put together that lead to a higher quality, longer lasting battery, BUT, so long as you choose a LiFePO4 you will likely get at least 10 years of life. I expect 20 years or more even though I went with a lower quality type of LiFePO4. The battery I chose is a 100 Amp Hour and includes bluetooth to monitor the battery capacity and charging/discharging rates.
This is where I made a mistake! I knew I wanted Lithium, and first chose a very large, all metal, very heavy, off brand battery that cost over $1000 for 240AH. It didn’t have bluetooth so I was left clueless when it malfunctioned and would not charge. I was also clueless as to what percent (SOC, or state of charge) it was at. To measure this properly, you need to disconnect all loads and measure the voltage at the terminals. Long story short, Lithium batteries have a Battery Management system and this one malfunctioned. I tried every trick in the book to get the battery management system to allow the battery to charge, but there seemed to be something wrong with one of the cells. . . the company allowed me to return the battery and I bought one with built in bluetooth so I can see what the battery management system is seeing and what it is doing as well as ready any error codes. I will include the link to one of the Original LiFePO4 batteries here because many have had great success and their customer service was great. I do not regret my experience with them, but I really like the ability to monitor each of my batteries easily from my phone.
LiFePO4 are expensive, so I bought two Renogy 100 Amp hour batteries despite my calculations saying I would need 600 AH total. THATS OKAY THOUGH. It is SUPER easy to add more of the 100 Amp Hour batteries (Up to 8 according to the directions) and they just show up in the app on my phone.

If you don’t know AH stands for Amp-Hours and gives you an idea of how much power the battery can supply. Most RV’s are 12 Volts and Power equals Volts times Amps, so 200AH of batteries times 12 Volts is 2400 Watt Hours of power. You can use either measure to figure our how many hours your batteries will last with no charging. If you want to use a fan that uses 5 amps, you would divide 200 AMP HOURS by 5 AMPS and you would be able to run the fan for 40 hours. If you want to run a 600 Watt heater, you would divide 2400 WATT HOURS by 600 WATTS to get 4 hours of heat! Yikes! That is a small heater and it really wouldn’t be on for long with my current small battery bank.
Of course, travel trailers don’t use just one thing at a time, and often things like heaters and microwaves, and refrigerators don’t run constantly either, hence it is difficult to figure out the number of batteries you’ll need. There are a million other aspects to decide how large of a battery bank you want. How big is your travel trailer, how many solar panels do you have? Do you have a backup to charge the batteries? (I do, thats why I’m okay with a smaller bank for now, see below for more on backups) Can your trailer handle the weight of those batteries? How well insulated is your trailer? Will the sun be shining at your latitude and for how many hours a day?
In short, go with LiFePO4. Choose a manufacturer that has batteries that can communicate with a phone or another device so you aren’t left guessing the batteries SOC (%). There are shunts (Battery Monitors) that measure voltage and amps on amazon look very unreliable and often cost more than the difference between the good quality battery and the low quality battery without monitoring. The shunt I linked to is the Victron Shunt. Victron equipment is well known as the best, but carries a price tag to match that claim. The shunts in my price range seemed to be finicky — Once again, better to get a battery that comes with monitoring build in or as an expansion.
Whatever size battery bank you decide, remember, most are expandable, and don’t forget that you should include some extra AH’s to account for degradation due to time and inefficiency.
One final aspect of batteries is how fast they can charge/discharge. Each of the 100AH batteries can soak up 50 Amps of charging current to charge in less than 2 hours. Whereas the single large battery was also capped at 50 Amps per battery and since it was a single battery would take nearly 5 hours to charge fully. If I had the maximum 8 parallel 100AH batteries, I could charge the bank at 400 Amps and it would still take 2 hours to charge the whole bank. This is assuming you have a charger, cabling and power source that can deliver that many amps.
Solar Panels
Our Travel Trailer has a curved roof so we chose flexible 100 Watt panels. When you see a 100 Watt panel, you should know that even the best brands will not produce 100 Watts. Most will be between 80 and 90 Watts in full sun and some of those watts may be lost to your inverter as well. Flexible panels are lighter, but degrade and perform worse, and cost more. Flexible panels produce between 70 and 80 watts when labeled 100 Watts. If you have a flat roof you should choose the traditional, less costly, more efficient, and longer lasting rigid frame and glass panels.
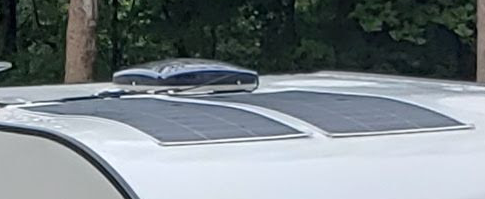
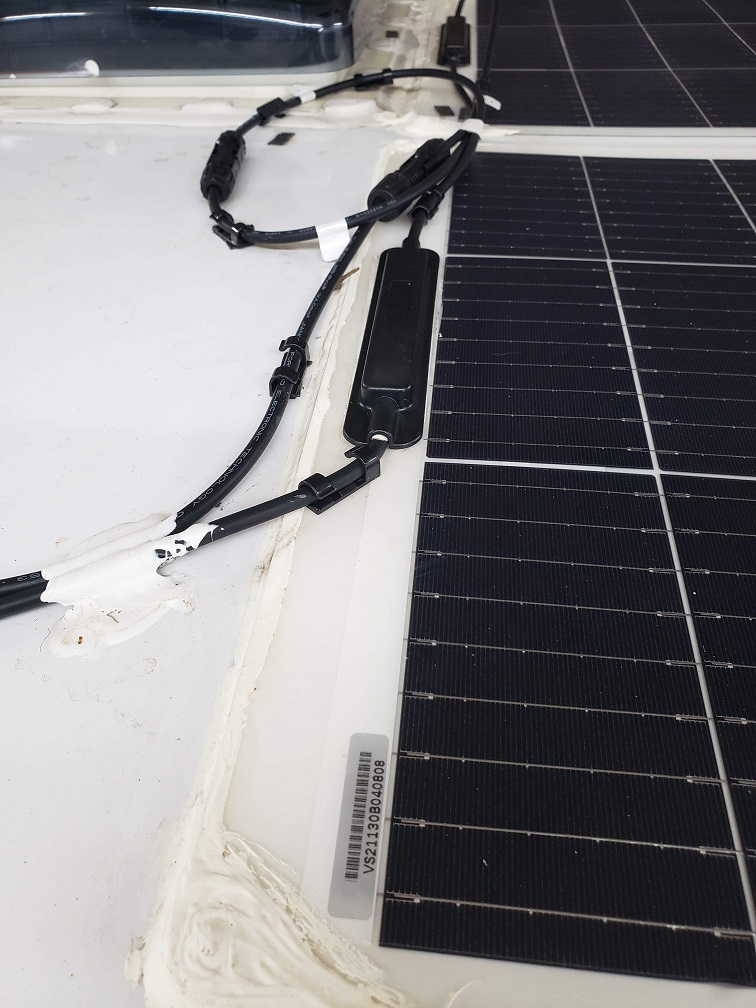
Fixing the panels to the roof is a big concern. Ideally they would be fastened with the proper screws and mounts to a structural member of the RV Travel Trailer. Some people just put a few dabs of Adhesive (even on the brackets for the rigid panels!). I think that is very risky and dangerous. Please be careful in how you choose to secure you panels. You should contact the manufacturer or your panel and ask them what they recommend.
For my flexible panels I used 3M 5200 fast cure (data sheet says a few square inches could lift the entire weight of my camper!) along the entire leading edge of the panel(about 20 square inches) and VHB (Very High Bond) 5952 3M Tape from corner to corner and along the edges between the panel and roof. The last thing anyone wants is equipment flying off of your rig, so please get some manufacturer recommendations and secure your panels properly
How many panels? We have only 2 panels. This seems to be good enough to run the fridge and charge our phones indefinitely on sunny days — with only 200Watts! Our small 17 ft camper could charge batteries and run air conditioning nonstop with 800 Watts, even through rainy days if we had a bigger battery bank.
My original plan was to wire the panels in series (+ to – one after another), but that would require a very large charge controller and any shading (common at campsites) would cause a significant drop in power produced. I recently read a forum that suggested running a few separate “strings” of solar panels and charge controllers. This eliminates the shading power loss, creates redundancy, and allows me to upgrade our system incrementally (as well as to use what I already have, less waste).
In short, my plan was to have a 60 amp MPPT controller(find out what MPPT means in the next section), but now I will keep my current 20 amp MPPT controller, and upgrade to two more 20 amp MPPT controllers in the future, each with three 100 Watt panels in series. Essentially, I will have 3 independent 300 watt solar systems. Now if you’ve been paying attention — 20 amps * 12 volts is about 240Watts, but our panels are 300 watts total. This oversizing of the panels(Only do with MPPT controllers, and always check the documentation) and undersizing of the charging controller is common in solar. The MPPT controller will “clip” the extra power and it will go to waste, but remember, a 100 watt panel only makes 90 Watts under the best of conditions and will degrade with time. Really what we are doing is optimizing the input to our controller.
Wiring in series adds the voltage but keeps the amperage the same. For example, my panels are about 20 Volts and 5 Amps, so three in series would be 60 volts and 5 amps — You must ensure you charge controller can accept this much voltage — Most accept at least 100 volts. Because amps are low, we are safe to use the standard 12 or 10 gauge solar wire. If I wire in parallel, I would add the amperage and keep the voltage the same, so if I did – to – to – and + to + to +, I would have 20 volts and 15 amps. Depending on the distance, you might need to move up to 10 or 8 gauge wire. Many sites of DC wire ampacity calculators. DO NOT MAKE A MISTAKE HERE YOU COULD START A FIRE!!!
Charge Controllers
There are two types of charge controllers: Pulse Width Modulation (PWM) and Maximum Power Point Tracking(MPPT). MPPT is what everyone chooses. They convert more energy compared to PWM, especially during low light. MPPT supports oversized arrays like we mentioned above so you can put 300 Watts of panels on a 20 Amp (260 Watt) MPPT Controller. MPPT does cost a bit more than PWM, but not much more.
When choosing an MPPT controller, you’ll need to select one that can support your solar panel configuration and also supports your battery chemistry (LiFePO4), Lithium profile. As I mentioned above, my original plan was a single 60 amp inverter with 800 Watts of panels.
There are a few reasons I like my new plan with 3 separate 20 amp MPPT inverters with 300 watts of solar panels each:
- Redundancy – 1 inverter can fail and I still have solar.
- Better in shaded situations.
- Can upgrade in phases
- Multple runs of wire, but the wires can be easy to work with 12 gauge which if you keep the amperage low are also safer.
- MPPT inverters allow you to maximize the losses by oversizing the panels efficiently, 300 Watts should be perfect for a 20 amp inverter once you take into account the other inefficiencies
Inverter Size and Voltage
Most people will want to convert the batteries 12 VDC to 120 AC that things like microwaves, air conditioners, and televisions use. There are 2 basic kinds of inverters: Standard and Pure Sine Wave. Pure Sine wave is more expensive, but is better for sensitive equipment and typically holds the voltage more steady under heavy load to avoid damaging things like refrigerator and A/C compressors. In my opinion, pure sign wave is worth it.
The next decision is just size, they range from about 100 Watts up to 5000 Watts plus. Also, if you need 240 volts of power (like many roof top A/C’s in travel trailer RV’s) there are inverters for that too though many require you to wire your battery bank to 24Volts or higher — see buck converters below.
Before going for an off brand, you may also want to see how efficient it is at converting energy. 75% efficient vs 90% efficient will effectively give you quite a bit more run time.
We chose a very small, but efficient, 1000 Watt Pure Sine Wave Inverter. The largest item we planned to run (A/C) pulls only about 700 Watts at its maximum power level while running. This model also can provide up to 2000 Watts briefly to help A/C compressors and other high inductive loads startup. The small power inverter is definitely not going to run every appliance in our camper at once, but I can run each large appliance separately if needed and all the small ones at the same time. The Renogy model we chose was affordable and had a remote switch as well as the ability to be hard-wired to the camper breakers. As mentioned above, Victron makes great equipment, but is above our price range.
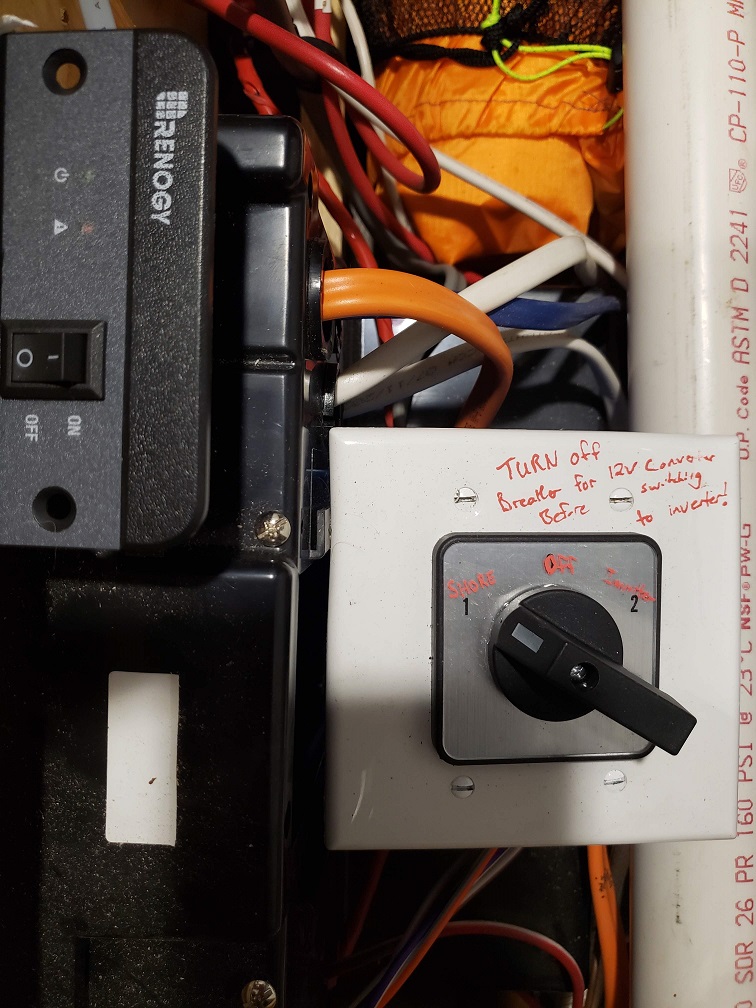
We use a selector switch to toggle between shore power and inverter power input into our WFCO breaker box. Since our inverter is small we can select which breakers we would like to power. It is important that if you do this modification, you make a note and remember to turn off the 12Volt converter breakers. It may depend on the manufacturer, but the best case would be that you would convert 12 volts to 120 volts, then convert it back to 12volts which is very inefficient and worse case you may end up blowing a fuse or starting a fire. So remember to turn off the 12Volt converter and if you aren’t comfortable with this type of wiring, you can always skip the hardwiring and just plug what you want to use directly into the inverter.
My final point about power inverters is that they will drain down your batteries VERY Quickly. Even my very small inverter can pull 85 Amps at full capacity and that will drain the batteries to zero in less than 2 hours!! So, I know bigger sounds better, but most campers settle with around a 2000 Watt inverter since that will provide essentially the power a standard 20 Amp wall outlet and can run a microwave (My 1000W would not likely be able to run a microwave) We aren’t really microwave people, but I have read that they do not like to be run on an inverter so I would defintely go with a 2000 Watt or better.

Backup Options
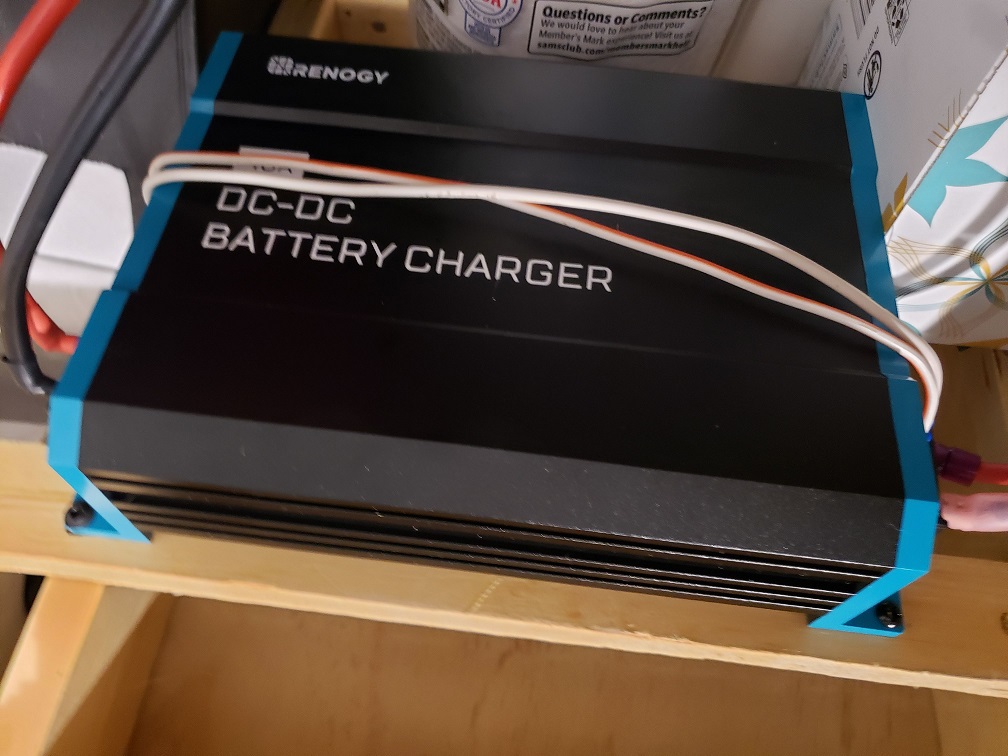
- DC-DC Charger– You CAN NOT hook up a lead acid battery to a lithium battery, just like you aren’t supposed to mix old and new AA batteries. The answer is a DC-DC charger, a magical box that sits between your engine/Alternator/starter Battery and your RV Travel Trailer battery. If you buy a small one, you can run it from the power port on your 7 pin trailer connector, just be careful to remember to disconnect the power otherwise you might drain down your starter battery. I opted for a medium sized one that I put right next to my batteries to keep the cabling small. At only 6 lbs, I can charge my batteries at 40 amps with jumper cables (Maybe not a safe idea), but I will stand by with a fire extinguisher within reach. If you’re good at math it would still be 5 hours to charge the batteries to full, but I expect to use this only in an emergency to run important items like our fridge — No A/C. Charging the batteries like this is terribly inefficient. Also, depending on the size you choose, you may need a larger alternator in your tow vehicle.
- Shore Power, Camper Converter – The 12VDC WFCO 50 amp charger that is standard in so many campers is capable of charging our 200 AH of batteries in about 4 hours. So . . . if you can find an outlet and can get your camper in close . . . that would provide us with several days of power even without solar. You can buy larger WFCO converters that could charge faster, and they have ones that are specifically designed for Lithium. My standard WFCO one is actually a bit of a pain, after 52 hours it switches to Float mode and lowers the voltage from 13.6 volts to 13.2 volts. It does this because after it charges the batteries. . .the battery steps in and supplies the power instead of the converter. This is fine at 13.6 volts as the Lithium batteries quickly recharge from the converter, but when the converter steps down to 13.2 volt float mode, it is no longer above the battery voltage and the batteries will run down to zero and unless you disconnect the WFCO Converter and the Battery for a minute to reset them and kick the WFCO into charge mode. My new tactic is to disconnect the battery when we are connected to shore power and do not need to charge, but the real solution would be to buy the proper WFCO WF-8944LIS-MBA that is designed to charge Lithium batteries.
- Generator– A small portable generator can run the Camper converter, some may be able to charge the batteries directly. This is an efficient off grid choice and would charge our 200 AH battery bank in about 4 hours.
Other Solar Stuff
Bluetti and other “Portable Solar Batteries”. I believed these to be a bit of a rip off, but recently had my eyes opened to the fact that some of them are good, if not overpriced compared to DIY. In particular, the bluetti’s with extra batteries combine many of the parts discussed in this article into a single easy to use for anyone box without a lot of effort. This has a 3000 Watt inverter to power anything you want and an INSANE 1000Amp Hours of Batteries. That could run the 5000 BTU window AC in our travel trailer for over 17 hours on MAX cool, ie, never stopping cooling. It would be an ice box. In reality it would probably be enough battery for several days of AC use. The only part that is missing is the solar panels and charger.
You may stumble upon the term Buck Converter. These are used when you want to run bigger battery banks with some batteries in parallel as well as in Series. This will bring your system voltage up to 24V, 48V, or more as Car batteries(some are in the high hundreds of volts) do. The problem will be that all the items in your RV Travel trailer expect 12 volts. This is where a buck converter comes in. It will step down the voltage to 12 Volts so you can use all you standard 12 volt appliances. Using 24V and 48V has advantages as well, mostly reduced power loss and smaller gauge wires that can span longer distances than 12 Volts. You can also purchase special TV’s, radios, refrigerators, etc that run of the voltage you need, but I think if you want that you’ve missed the spirit of this article and this site. I believe it is best to keep things simple, 12 Volts with batteries and an inverter to run very cheap 120Volt TV’s, microwaves, air conditioners, etc, that you can buy at Walmart for very cheap prices compared to their direct 12volt brethren. The Buck Converter I linked to above is for 48V to 12Volts and is bidirectional meaning it just goes between your batteries and the rest of the equipment. You’re probably only interested in a buck converter if you need a very large battery bank or you need to run a 240 Volt inverter that requires 48Volt input.
Conclusion
This turned into quite a comprehensive overview of Solar systems in RV Travel Trailers. Writing it only made me realize how much I researched and used my own knowledge and life experiences to design my own system. It can certainly be an overwhelming task, but if this helps even 1 person, I suppose it will be worth it. I don’t think this page should be your only stop in this journey and for liability reasons you should probably run your plans by the manufacturers or other knowledgeable experts.
Below is the list of components I’ve currently invested into our camper and what it means for us.
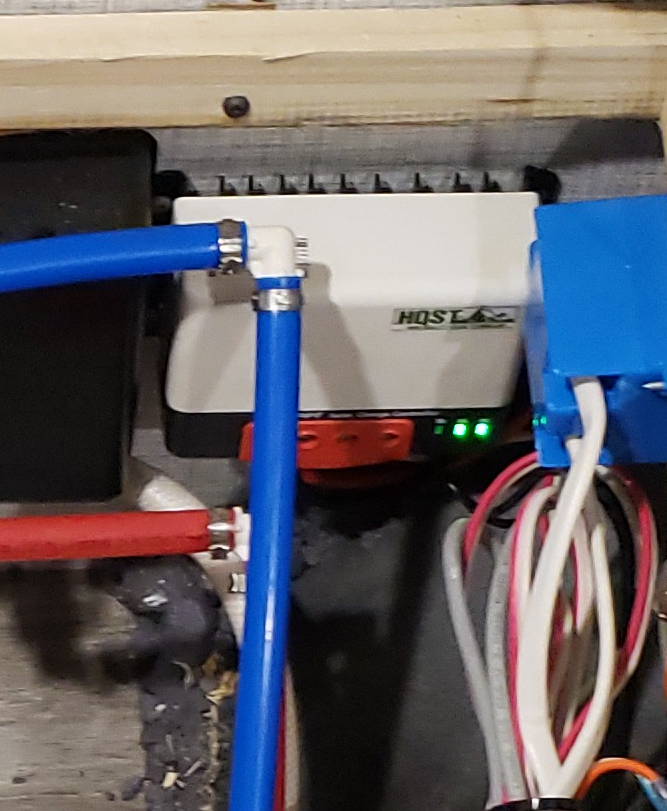
- 100 Watt HQST Flexible Solar panels x6 (600 Watts should allow us to run the A/C at night for an hour for bed time and not run down the batteries too much)
- 20 amp HQST MPPT Solar charge controller x2 (Keeping small controllers allows smaller wires, prevents some losses from shade)
- Renogy 1000 Watt Pure Sine Wave Inverter (Big enough to run our largest appliance, small enough to be efficient)
- Renogy 100 Amp Hour LiFePO4 battery with Bluetooth x2 (200AH keeps the fridge and phones charge indefinitely, even with shady days, no Air conditioning though)
- Wires, too many to list
- Fuses between panels and solar inverter (protects wires and life/assets in case of fire)
- ANL Fuses (protects battery wires between battery, inverter, solar chargers, and RV 12 Volt Converter)
- Selector Changeover Switch (Swaps between inverter input and Shore Power input- THIS CAN BE DANGEROUS – Consult an electrician!)
- DC-DC Charger – (Backup charging source, allows us to safely charge the batteries from our running car)
- RV Solar Wire Port (better than the hole filled with DICOR I have currently)
- Dicor – For sealing roof holes where wires enter
- 3M 5200 Adhesive (What I used to secure our flexible panels leading edge)
- 3M VHB Tape (Also securing the flexible panels to the roof)
- Champion 2000W Dual Fuel Generator (Backup charging source, but it honestly doesn’t fit anywhere and we don’t want it to be stolen, so we typically leave it at home. Great for when hurricanes roll through though, we’ve only ever run it on propane and it runs so clean.)
- Disconnects x2 (One for the batteries and One for the solar – Required to trick the WFCO into entering Bulk Charge mode again)


