
Start with Why

I love to make stuff and watch my family smile and I bet if you have ended up on this page, you like projects and surprising people too. Adding a turbo button to a Power Wheels vehicle is a sure fire way to bring a smile to a child’s face and to yours and mine. The best part is, depending on what you have laying around, this is can be free to about $30 and an hour of your time.
Safety for Power Wheels Turbo Button!
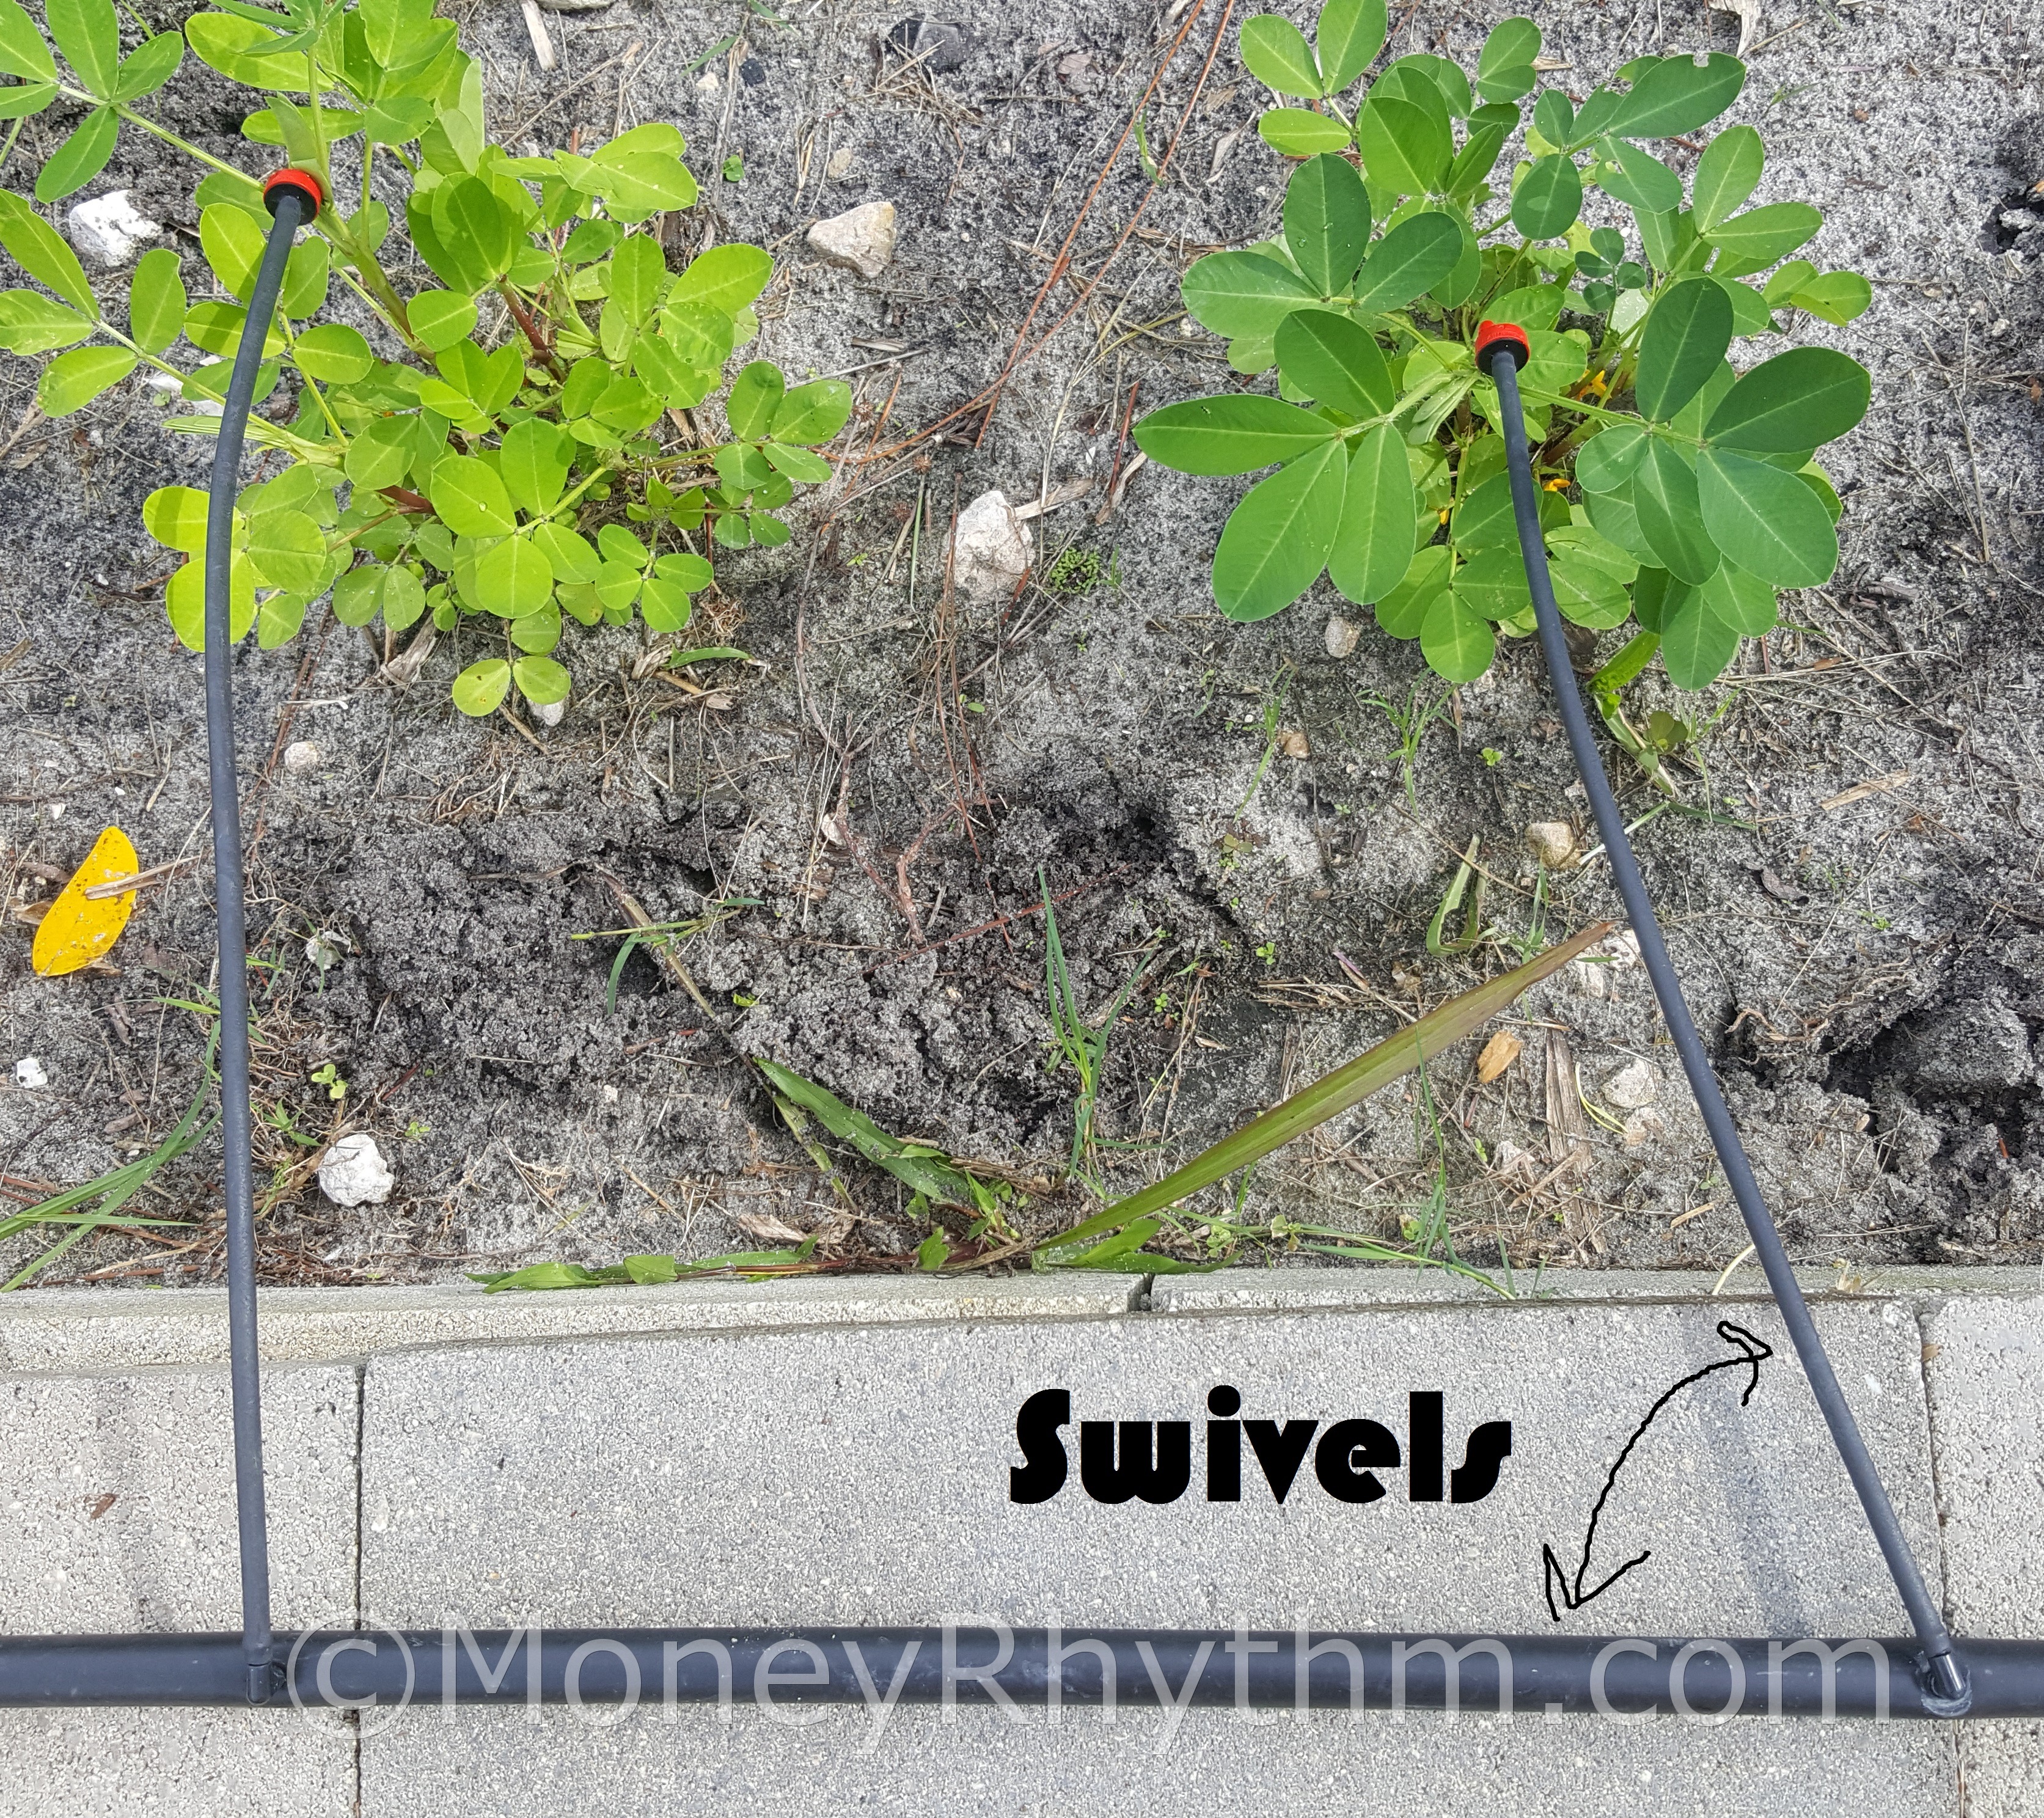
Adding a turbo button can be dangerous and the safety of children is of utmost importance. Seriously, fasten extra batteries securely, use SEALED lead acid batteries, keep high current switches and wires buried and away from kids, use fuses, and use safety equipment for the kids (ie, helmets).
Also, please be aware that if you do not hook up the wiring correctly, you could fry the wiring and or motors irreversibly. Modify at your own risk!
I’ll be honest, my first time modifications were not safe. My kids flipped the jeep going up a hill and hitting the turbo button . . . The battery fell out. Luckily it didn’t hit them or leak and was soon securely fastened. I used relays and hid my wires away from the kids, but I didn’t use fuses. Eventually the 24V fried the motors and we started smelling a burning smell while using the jeep.
Options for a Turbo Button
There are two schools of thought on the internet for adding a turbo button to a Power Wheels car and my own flavor that makes it more realistic, hereby dubbed the “Ultimate Power Wheels Turbo Boost Button”.
| Heavy Duty 3 Way Switch SPDT (20A @ 12V) | Momentary Push Button and Relay |
| Pro – Slightly easier and cheaper to wire | Pro – Child can only engage “Turbo” mode when they push and hold the button. This keeps the current down and allows the motors to cool between boosts |
| Pro – Relatively easy to replace | Pro – Relays are designed for higher current (30A @ 12V) |
| Con – Switches are for controlling, not passing current. This is a safety concern and a weak point in design that is likely to fail when current gets too high, especially if your little one leaves “Turbo” Mode on | Con- about 6 wiring connections vs. 3 and a slightly more difficult diagram to follow. |
| Con – A child could just leave the switch in “Turbo” mode | Con – Kids can abuse the relay by weakly pushing the switch and causing it to engage/disengage rapidly (Which they will think is funny as the powerwheels starts to vibrate). A time delay relay can solve this problem (See Ultimate Setup Below) |
| Con – Can drain the “Turbo” Battery very quickly |
Battery for Power Wheels Turbo Button
The big decision here is going to be between a 6V turbo Battery vs a 12V turbo battery. There are videos of people increasing the voltage to 48V on these motors, but at that voltage, your motors will be fried at the end of your first trip if your plastic gear box doesn’t just strip out. Here is a list to help you decide.
|
6V Battery |
12V Battery |
|
Pro – Probably won’t break motors, wiring, or plastic transmission |
Pro– Can use a charger you probably already have |
|
Con & Pro – Not as fast (5mph becomes about 7.5mph), but more safe |
Pro– Faster turbo, bigger smiles (5mph doubles to near 10mph) |
|
Con – requires a separate charger |
Con – 24V total turbo will put much more than double the stress on system components, expect a failure anywhere from instantly to a year from now. Our Power Wheels jeep lasted a year and a half |
|
Con – Less Safe, have kids wear safety gear |
Battery type and size for PW Boost Button
You could just use an old 12V Lead Acid battery that couldn’t start your lawn mower any more or buy a new small lead acid battery from a local store for $30. For safety, I recommend you buy a Sealed Lead Acid battery so there is reduced risk of acid leaking out and hurting a child. Most local stores don’t sell this type of battery, but the market for motorized wheel chair batteries has many great options at different capacities and Voltages.
| 12 Volt 9ah SEALED Lead Acid (SLA) | Small, easy to place and secure, only $22, This is the one I used |
| 12 Volt 35ah SLA | Battery I used as main drive, triple capacity and less cost ($67 currently) than a lower capacity PW Battery, purchased in 2015 and still kicking 3 years later! IF you haven’t replaced the original PW battery yet, this one drops right in. It is probably overkill for a “turbo” Button. |
| 6 Volt 4.5 Ah SLA | Small, easy to place, safest option for longevity, only $14, but you’ll need this $10 6V/12V switchable charger |
| 6V 4ah 2 pack | You could decide between 6V and 12V later by using one or both batteries, only $18, You could also run 18V as a base and boost to 24V. |
Wiring Diagram and Materials list for Switch Style Power Wheels Boost Button
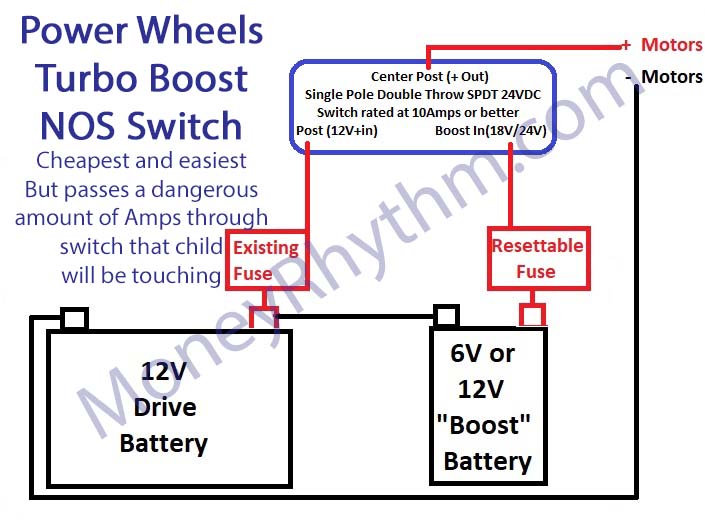
I’m just going to get to the point here. Though this is very easy to wire, the current passes through the switch only. This could make the switch VERY HOT to touch or cause it to short out with a spark because you will definitely be pushing the limits of any SPDT switch you purchase. The kids can also leave the “boost” on all the time which might melt wires, motors, and fuses. Here is the diagram for your reference to use if you choose this option, but please consider the Relay option next for safety.
Materials
- SPDT Flat Style Switch 3 Pack OR SPDT Universal 20A Switch Blade Style (my daugther fell on and broke one of these in the on position for a different mod, running over everything in her way . . . funny now
- 6V or 12V Battery such as 6 Volt 4.5 Ah SLA
- Wiring Spade Terminals Male & Female
- Wire (needs to be higher gauge for high current)
- Resettable 30 Amp Fuse OR New 30 Amp Single Use Fuse with Fuse Harness*
- Electrical Tape
- Wire Cutters
*30 amp fuse should be good and protect the motors, but you may need to buy 40 Amp if you expect 2 kids+ to be using the powerwheels often. Install fuse thiting 6 inches of positive battery terminal.
Wiring Diagram and Materials list for Momentary Push Button Relay Style Power Wheels Boost Button
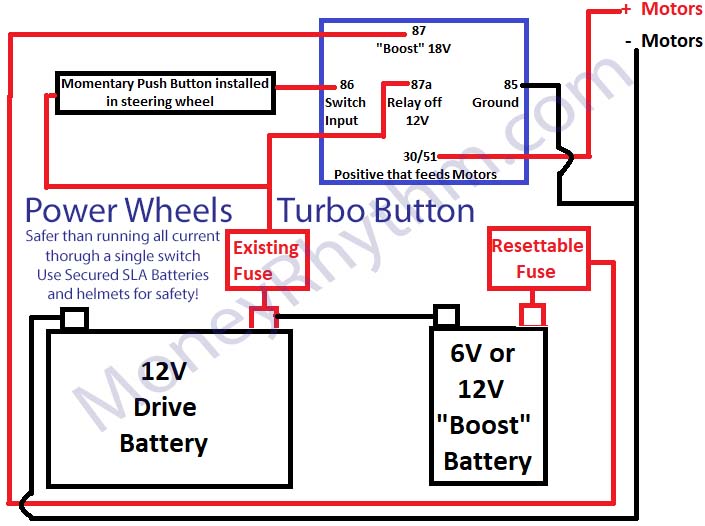
This is not much more difficult to wire than a switch and keeps high current, hot wires tucked away from little fingers. Momentary push buttons are also small enough to install directly into the steering wheel (See first photo) which isn’t as hard as you would think. Boost will start when they push the button and stop when they let go, much more exciting than a switch anyway.
Materials
- Momentary Push button – Prewired ($7)- The terminals on these buttons are small and hard to work with, prewired will also fit better in a tight spot like the steering wheel
- Relays (40 amp, 5 pack) ($13) These come with a harness which will make changing them out if they go bad very easy
- 6V or 12V Battery such as 6 Volt 4.5 Ah SLA ($14)
- Wiring Spade Terminals Male & Female ($10)
- Wire if you don’t have any laying around
- Resettable 30 Amp Fuse ($9) OR 5 Pack 30 Amp Single Use Fuse with Fuse Harness* ($8) OR you could use the spade terminals above and make your own
- Electrical Tape
- Wire Cutters
*30 amp fuse should be good and protect the motors, but you may need to buy 40 Amp if you expect 2 kids+ to be using the powerwheels often. Install fuse thiting 6 inches of positive battery terminal.
Ultimate Power Wheels Turbo Button Setup
I haven’t seen this idea anywhere on the internet, but after my son and his little friends used my old Jeep Powerwheels with Relay boost button setup it had one clear flaw — kids loved pushing the boost button very quickly causing the relay and Jeep to lurch and have a “seizure”. This burnt out the relay after about 6 months and put way to much stress on the motor and transmissions.
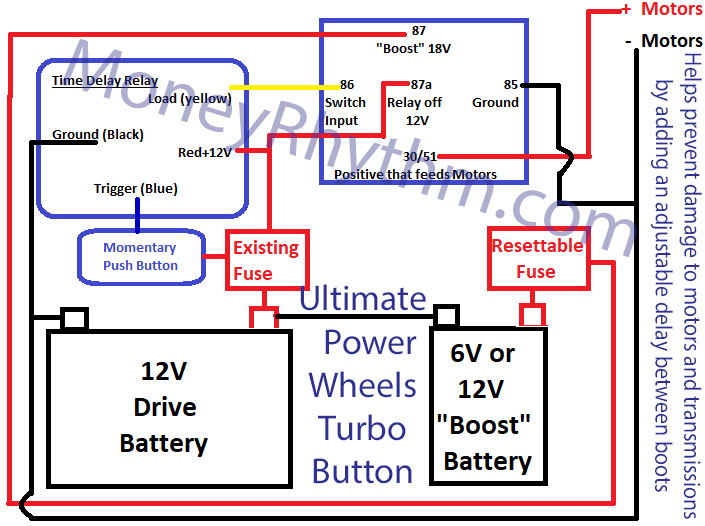
If you can install a relay, you won’t have trouble with this upgrade. Purchase a Mini Time Delay Relay (About $20 at this time) between the push button and the relay. The relay is highly customizable and after reading the manual, Function #29 sounded perfect, called Interval with Lockout. My kids can push the button and they will get a customizable length of boost (I picked 5 seconds) followed by a lockout time of 5 seconds (again my choice). This forces time for the motors and harnesses to cool down and the kids can choose whether they hold the button down or just “click” it once to get their 5 seconds.
Longevity
The most long lasting version of this upgrade would be for a single rider (weight increases amperage which will kills the motors), use the 6V boost battery, use a relay with a momentary push button and a timer delay.
I’ll be honest though, Power Wheels can be found used on Craigslist for less than a third of their asking price in great condition. I always go with the 12V boost battery and I probably won’t hound the kids about overloading it, but I will incorporate a good resettable fuse to protect the motors.
Conclusion
I kind of wish I had two of the Timer Delay Power Wheels Boost Button models, because I could see kids really having fun racing each other with the delay feature enabled. Perhaps when my youngest is old enough to race. I poured a lot of time into making this post and the detailed diagrams from scratch, feel free to link to my site, but do not steal my images or text. Please leave a comment or a picture of your setup and I hope it brings a smile to your face. Remember to be safe with the modifications, hills, etc!
The links above are affiliate links which means I get a small percentage of your purchase if you make it within 24 hours and it does NOT affect the price you pay at all. Affiliate links help pay for the costs of running a website like this one.


